Use the Part-Editor to edit one Part.
To edit a different Part:
1.Exit (close) the Part-Editor - see also How to exit (close) the Part-Editor
2.Select and edit a different Part.
Video: How to start the Part-Editor:

5 Ways to Start the Part-Editor

5-Methods to Start-the-Part-Editor
How to start the Part-Editor
Do one these methods.
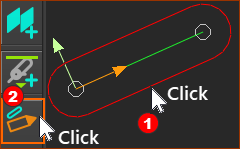
 METHOD 1: Edit-Part tool
|
STEP 1: Click a Part-Outline STEP 2: Click Edit toolbar > Edit Part You can now use the Part-Editor to add, edit, or delete sketch-elements and constraints in the Part-Editor. |
|
|
Note: The (MD17: Toggle "Part-Editor") icon is to the left of the graphics-area. See also: How to close the Part-Editor: Method 1 |
|
METHOD 2: Selection-Window
 STEP 1: Click a Part-Outline |
STEP 1:Select the Part In the graphics-area:
or Assembly-Tree:
STEP 2: In the Selection-Window
The Part is now open in the Part-Editor. |
|||
 STEP 2 : Right-click the Part element in the Selection-Window, |
METHOD 3: Double-Click
 Double-click a Part-Outline in the graphic-area |
STEP 1: Double-click ... in the graphics-area:
The Part is now open in the Part-Editor. OR Double-click ... in the Assembly-Tree:
The Part is now open in the Part-Editor. |
||
 Double-click a Part in the Assembly-Tree |
|||
If you double-click a: |
|||
... the CAD-Line dialog opens |
|||
... the Blend-Curve dialog opens |
|||
... the Point Properties dialog opens |
|||
More than one element |
... nothing happens. |
||
METHOD 4: Right-Click
 Hover+ Right-click a Part-Outline in the graphic-area |
In the graphics-area: 1.Move your mouse above the Part-Outline Note: With some graphic-cards, move your mouse to the arc at the end of the Part-Outline near to the start-Point of the Part and CAD-Line. 2.Right-Click the Part-Outline 3.Click Toggle “Part-Editor” (MD16: Edit in Part-Editor) from the shortcut menu. The Part is now open in the Part-Editor. |
Occasionally, there is a problem with a Graphic-Card
With INTEL graphics cards, you may not be able select the Part-Outline to edit a Part. Try these methods: |
|
 Select the Part-Outline near start-Point. |
Method 1: Graphics-area 1.Move your mouse-pointer above the arc of the Part-Outline near to the Part's XY-axes - see image/ 2.Double-click your mouse Method 2: Selection-Window 1.Move your pointer above the Y-axis- see image below 2.Click your mouse one time. In the Selection-Window: 3.Right-Click the Part 4.Click Edit element |
 OR Double-click the Y-axis |
Method 3: - Y-axis (the easiest?) 1.Double-click the Y-axis. |
 Select a Part in the Assembly-Tree |
Method 4: Assembly-Tree In the Assembly-Tree 1.Right-Click the Part 2.Select Edit element in the shortcut menu.
|